On December 1st, we moved three pregnant cows to our property for our agriculture tax exemption. We have never had cattle before and there will be plenty of lessons learned through the process. Some will be relatively small while others will be quite major.
Lesson 1: Quality Fencing
It is easy to think that your existing fencing will work but when new cattle are added they test the fencing.... especially in the corners. You really need all sections of fence exposed and confirmed solid. We had our cattle on our land less than 24 hours before one of the three managed to jump a low section of fence. We still have some work to make the fencing ideal but there was some stressful working days trying to make sure the fence was right as you don't want to lose an expensive cow being cheap on your fence.
Lesson 2: Hay Rings
We have an old hay ring which we used for the first bale of hay. The cows rattled loose or bent several of the six bolts which held it together causing it to lose its shape. When we set out the second bale, we did not use the ring expecting to fix it and then lay it over the top later
In the week it took me to make it back out to fix the hay ring, the cows had spread the hay bale almost completely out in a 20+' radius. They stomped the hay into the ground and used the restroom on it such that they would not eat it. From this point forward, we are always going to have a hay ring in place as it saves money from wasting hay.
Lesson 3: Use of Feed Trough
This has proved to be important as a place the cattle know we will meet them to feed the cubes. Sounds strange but until they knew us, we would just drive to find them. Once they started hearing us and we regularly fed them at the trough it became a place we met up with them to check on them.
Lesson 4: Cut Bulls Quickly
If you intend to cut young bulls the earlier you take care of it the better. We waited a few weeks (3.5) and the bull was starting to get larger. We still managed but it would have been much easier to do when he was younger and put up less of a fight.
Lesson 5: Record Keeping
I've found it helpful to keep records of when we put out new hay, times we check on them, and the birth records in a single calendar with my ag exemption card. The information is all then kept together for future reference. It is also good to keep some business cards in there in case you lose a cow and need to hand out something so neighbors you don't know yet can easily call you.
Lesson 6: Removing Livestock
Adding livestock to your property is considerably easier than removing it from your property. We did not have a proper fenced in area to move them into to load them onto a trailer. You really need to have such an area available to treat your livestock, feed at points, and load from.
On October 5th, we removed our cattle from the land. We had them on there for the last 10 months. It was an incredible process to remove them due to a young calf which would run off rather than cooperate. I'd like to have cattle again as they help maintain the land but there are many things we would need to do first:
Saturday, December 29, 2018
Wednesday, December 26, 2018
Cattle Feed Trough - Made from Extra Wood & a Plastic Barrel

We added cattle to our land three weeks ago. Each weekend since, we have visited to check on the cattle and fencing. Each time we visit, we ride the perimeter of the property on a four wheeler to find the cattle. We then feed them some cattle cubes and try to get them a bit more comfortable being around us.
I'd like to be able to call the cattle up as needed rather than drive around to find them. This is certainly going to be a bit of a process. We have tried calling them and shaking a feed bag with cattle cubes in it but it does little good. If we can call them up to a pin area and feed them there, we will be in a better position later to care for them by being able to easily call them up to the pin as we have done it so many times to feed them.
I decided to use a spare plastic 55 gallon barrel and some extra 2" x 8" wood to make a feed trough. This will beat pouring the cattle cubes out on the ground and will work well as a regular place to feed so they know exactly where to go time after time.
To build the trough, I used a reciprocating saw to cut the plastic 55 gallon barrel. I was initially concerned I would not cut it straight enough but found a seam line on the barrel which marked exactly the center of the barrel which greatly simplified the process.
I made the frame surrounding the top of the barrel pieces first (59" x 28"). Once it was built, I cut legs for each of the four corners. Due to the piece of wood I had available, I cut the legs to 23" to make the best use of the wood. I then mounted the barrel halves to the wooden surround with some screws from Lowe's.
I imagine it would be sturdy enough with just the legs at the corners but I wanted some supports under the barrels to reduce my reliance on just the screws to hold the barrel halves in place. This required some additional wood from Lowe's to add the center set of legs so I could put 2" x 6" supports underneath each end of the barrels. This made the trough quite heavy and really strong. If nothing else, this will keep the cattle from turning it over.

I finished the project up by drilling four 1/4" holes in the bottom of the barrel. These should allow any water which gets into the trough to drain out.
I didn't have any screws to build the trough so I had to buy those plus two 2" x 6" x 8' boards. Considering most of the supplies I used were scrap, I have about $20 in the trough.
Sunday, December 16, 2018
Hunting Review - 2018
This year I was rather excited about hunting as I finished my larger work projects early and there was not much to stop me from hunting quite often. I setup my game camera and feeder on Labor Day (September 1st). I then returned to check it on October 13th and found pictures of two very nice bucks.
The first of the two is a 16 point buck that I first saw last year. Last year, he was a 12 point which looked strangely like a mule deer with the way his antlers forked. However, in the last year, he grew numerous little points which took him from 12 to 16 points. I saw him on my game camera at the following times:


The first of the two is a 16 point buck that I first saw last year. Last year, he was a 12 point which looked strangely like a mule deer with the way his antlers forked. However, in the last year, he grew numerous little points which took him from 12 to 16 points. I saw him on my game camera at the following times:
09/02 07:14 AM – Remained at the feeder well into daylight. Left at 07:28
09/08 06:48 AM – Remained with cattle and other bucks present until daylight. Left at 07:04
09/13 18:21 PM – Arrived during daylight hours with other bucks but only in a few pictures.
My camera is horrible with battery use so the camera only took pictures from September 1st until the 16th.


The next was a 10 point which I saw in only one picture standing away from the feeder. This year, he came up to the feeder on several occasions including:
09/02 20:24 PM - Arrived after dark but remained until 21:00
09/02 22:32 PM - Only seen in one frame. Arrived after dark.
09/06 19:01 PM - There until 19:05 during daylight hours all alone.
09/08 06:40 AM - Cattle present but no other bucks. Remained until 07:08.
09/09 06:35 AM - Remained until 06:49 during daylight hours with other deer.
09/10 18:05 PM - Remained in daylight hours until 18:14
09/10 18:36 PM - Arrived during daylight and remained until 19:17


I replaced the batteries on October 13th which is when I found these pictures. I was very excited at the opportunity to shoot these two large bucks. I arrived at the beginning of hunting season and checked the camera immediately hoping for more pictures. I was disappointed to fin there were no pictures of either buck.
I hunted November 7th, 8th, 9th, 10th, and 11th without any sight of these two bucks. There was no moon at the time and a cold front had just arrived. However, it was quite windy one day and another day rained most of the day. I was rather spent after hunting for 28 hours over this period of time. I replaced the camera card and batteries and went home.
I returned on November 23rd to hunt and found no images of either buck on the camera. I did not really have any bucks on the camera at all. I was rather surprised they disappeared but had the same thing happen the year prior with an 8 point buck I was watching.
I ultimately shot an eight point buck on November 25th. At that point, I had hunted for a total of 44 hours and was beginning to lose hope. While he is not very large, he is actually the largest of what I have seen on my camera once the 10 and 16 points disappeared. In hindsight I would have been better off shooting a doe and retaining the chance to hunt the big ones again but I was getting discouraged and decided to take the shot.

I'll be going out again before long to check the game camera. We did not have nearly any rain for months until late September and then it seemed to rain non-stop. I'm wondering if the lack of rain limited food options causing the bucks to come to the feeder. Once it started raining, it seems they disappeared. I don't know that anyone shot them as they disappeared before the season started but who knows.
Sunday, October 7, 2018
Hunting Luck Under Difficult Conditions

In anticipation of the 2015 hunting
season, my son and I began packing for opening weekend at least a week early. The truck was loaded Friday morning so we could quickly leave that day after work and start our 2 1/2 hour drive to the deer lease.
Our plan was to stop briefly
at McAlister’s in Temple for a couple of sandwiches before finishing the
2.5-hour drive. We talked about the
expectation of cooler weather for the weekend as we ate. My son, who was only 13 at the time, realized he did not bring near enough cold weather gear. Despite packing his own gear for countless cold weather BSA camp outs, he was not as prepared.
As we left McAlister’s, we
noticed a Ross Dress for Less store
in the same shopping center as the McAlister’s.
We searched the store but found no jackets which fit. We settled on a second hoodie which was
somewhat thicker and could be used as a second layer while hunting. While not the best option, we decided it was
adequate and continued the trip.
The night before opening morning,
everyone on the lease can be found checking and comparing game camera
photos. I joined in as my camera card
was pulled earlier in the evening by a fellow hunter. Hope was low for an impressive buck as game
camera photos from my hunting area contained at best a small eight point. Regardless, we were optimistic and my son and
I looked forward to hunting from the stand I built the season prior.
My uncle Ralph suggested I hunt an extra
deer stand he added a few months prior. The
stand was setup with a corn feeder but no game camera. As a result, we did not know if deer
frequented the area but not have much to lose.
His only words of caution were to bring a can of wasp spray as he had
not checked the stand in a few months.
After some deliberation, I decided to
hunt my uncle’s extra stand. We discussed
the location of the stand on the 1,000-acre lease. The directions to locate the stand seemed
simple enough but being new to the lease I was a little uneasy about finding it
in the dark the following morning.
We woke early the next morning and drove
to an old barn which was the starting point of the directions the night
before. As my son and I started the expected
300 yard walk to the stand, it began to rain quite heavily. Within minutes, I began to question the
decision as we were both quite wet with no deer stand in sight. We eventually located the stand after walking
near 10 minutes in the rain.
My son waited with our gear under a
nearby tree as I checked out the stand.
Frustration increased further as I checked the inside of the stand with
my flashlight and found it filled with yellow jackets. The cold kept them huddled in the nooks and
crannies along the ceiling. I debated
heading back to my stand to try to salvage the morning hunt but decided with the
rain it would not be worth it.

As the rain continued, our best option
was to kill the yellow jackets. We could
then potentially still hunt and get out of the rain. After using almost a full can of wasp spray,
the floor of the stand was covered with dead yellow jackets. I brushed them from the stand floor to the
ground outside and very hesitantly crawled into the deer stand with my old son.
The stand began to warm up as the sun
rose. The warmth brought the remaining
yellow jackets to life and they could be heard buzzing along the ceiling and
corners of the stand. My son and I were at
full alert alternating between watching for deer and yellow jackets. There were many more yellow jackets than deer
but thankfully it was still cool enough that they crawled the walls where they
could be easily killed rather than flying around.

Between bouts with yellow jackets, a
large buck chased a doe across the top of a nearby ridge. I reached for the binoculars to get a better
look just as my son called out beside me holding his ear. The buck distracted us long enough for a yellow
jacket managed to sting him on the ear.
We handled the yellow jacket and after a quick check of his ear found
the buck and doe he was chasing were long gone.
We watched carefully for the buck to
return for the next hour. There were
other bucks which arrived with a few does but they were not as impressive as
the buck from earlier in the morning. My
son was eager to get a buck and we discussed the option of taking another deer
visible instead of waiting for a chance at the one we saw earlier in the
morning. Since it was the first hunt of
the year, I was not ready to compromise and it was still early in the morning
so we waited.

We watched as the deer in the field begin to lay down as it continued to rain lightly. The rain paired with a headwind were working in our favor to keep the strong smell of wasp spray from impacting the hunt. My doubt of seeing the early buck began to grow when he suddenly appeared at the top of the ridge again. He appeared in a small gap between two shrubs looking in the direction of the stand.
He quickly vanished earlier in the
morning and I expected the same this time.
I skipped reaching for the binoculars and went to directly to the
rifle. He stood proudly between two shrubs with his head held high. Even
without the rifle scope, his antlers looked like a crown on his head and was
larger than any other buck I’d seen in my short time hunting. The situation was almost unbelievable at the
moment.
I collected myself and prepared to shoot
the buck. He was quartered towards me at
almost 200 yards. I considered waiting
for a better shot but did not want to miss my opportunity. I aimed carefully but when I pulled the
trigger only heard a slight click. I removed the round and found the rifle had
misfired.

My mind returned to when I was hunting
years before at the same age as my son.
My rifle misfired then when attempting a shot with one of my father's rifles. I assumed then it was a problem
with the round and attempted another only to have it happen two additional
times. The last attempt resulted in a slightly
delayed fire causing a bad shot on the buck.
Young and inexperienced, I went after the buck to put him out of his
misery only to continue to experience misfire problems. Following that hunting trip, I decided
against hunting for the next twenty years.
I loaded another round and refused to be
distracted by the oddity of the situation. I regained focus, pulled the trigger, and a
loud bang filled the deer stand. The
buck spun around quickly and sprinted off out of sight into the shrubs. We watched carefully but did not see him
emerge from the shrubs. We waited a long
30 minutes questioning if I had by chance missed the buck before leaving to
check.

We went straight to the stop he stood
when I took the shot. We found blood
there and more in the middle of the shrubs which were immediately behind
him. We walked the ridgeline looking closely
for more blood but found none. We walked
all along the top of the ridgeline as I refused to accept that I missed.
In the end, we returned to where he
stood when I took the shot. As I looked
back toward the stand attempting to determine were I went wrong, I saw the
white belly of the buck. He entered the
shrubs and then headed down the hill towards the stand. He fell only 40 yards away in a place blocked
from view by a large tree.


My dad was finishing with his morning hunt
when I texted him about the buck. He
quickly came over to assist in loading up the buck. The rain made the field quite difficult to
cross in the truck so we drug the buck almost 125 yards to an area where he
could be loaded into the truck. We then
quickly returned to the house to discuss the morning hunt with others.
While sharing the story with everyone, a
family friend who hunts with us suggested I take him to the Cabela’s in
Waco. Cabela’s was offering a free
shoulder mount to the best buck taken opening weekend. I doubted the buck would be the best in the
area despite being my best buck. In the
end, I decided it was worth the drive.
I placed the buck in the freezer for the
remainder of the day and that evening.
The next morning, I loaded him into the back of the truck and headed to
Cabela’s. They measured the buck in the
parking lot of the store and told me at that point I had the largest buck
entered at that point.

The next several days I waited rather
impatiently for the outcome of the contest.
On Monday evening, I was called and told I won the contest and would
receive a free shoulder mount from Fortson’s Taxidermy.
Fortson did an excellent job on the
shoulder mount and the buck now decorates the wall in my living room. He is positioned in the same way he was that
morning at the top of the ridge. My son
an I relive the hunt each time we look up at him and it will be a great hunting
memory we keep forever.
Thursday, September 27, 2018
AA Forge Knives

AA Forge knives have quickly become my favorite. The knives are produced by Adam Gray in Trenton, Ohio. He started making knives as a hobby in his parents basement back in 2009.
Maker's Mark
Adam's blades can easily be identified by his maker's mark of an 'A' near the heel of the blade on the right side. The original style marker's mark utilized a more traditional style font. On August 9th, 2014, AA Forge announced changing the maker's mark to more of a cursive style appearance.

Identifying Blade Material
Immediately below the maker's mark is generally a symbol which indicates the steel used to produce the knife. The image on the left above has nothing present below the A indicating the knife is produce with 01 tool steel. The knife on the right above has a dot below the A which indicates it was produced with 52100. More recent knives, like the one below, include a small X beneath the maker's mark which indicates 80CRV2.

Adam has also recently used AEB-L and NitroV. I believe these have both been marked with the small X but I'll need to confirm.
Knife Grinds
Flat
Convex
Scandivex
Scandi
Blade Flats
Knife Models Produced
AA Forge Trapper
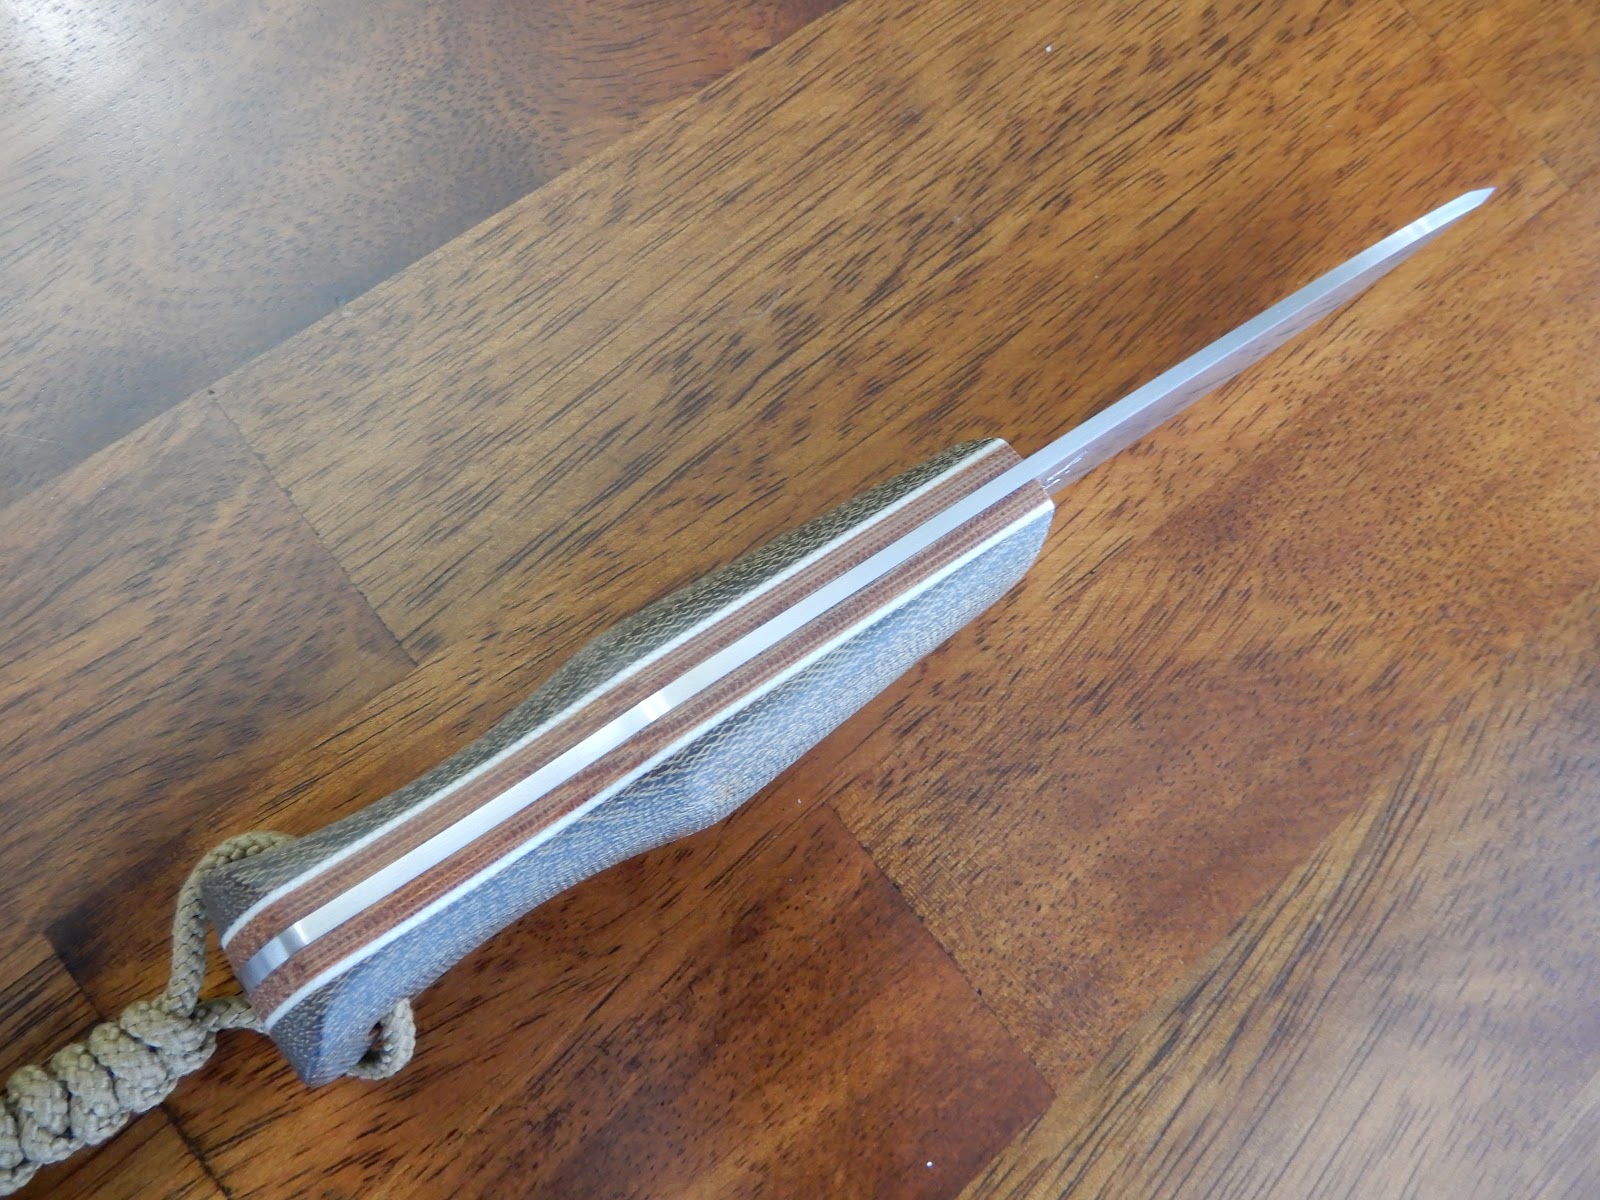
This is a AA Forge Mini Trapper which shows signs of use but not abuse. There is some patina on the blade. The blade is 1/8" 52100 steel and insane sharp. The handle is ironwood with what appears to be G10 green liners. The pins are brass mosaic. The knife comes with a handmade sheath which holds the knife but is not as tightly as I tend to prefer.


Mini Bushcrafter
I owned this AA Forge Mini Bushcrafter until recently. The knife is smaller than most with an overall length of 7 3/4" mostly due to the 3" blade. Despite the small overall size, the knife has the super comfortable contoured handle that is common to AA Forge. The handle scales are walnut with thick white G10 liners and brass pins. The blade is a 3" scandi grind in 52100 steel.
The knife fits perfectly in a dark brown Diomedes sheath. The sheath came with the knife and was a very light tan color. I dyed the sheath a darker brown which improved the look considerably.


AA Forge Woodsrunner
This AA Forge Woodsrunner is made from 1/8" 52100 steel with a convex grind. The handle is made from ironwood burl, stabilized navy burlap, with thick micarta liners. The knife is 9 1/8" overall with a 4 1/8" blade.
The handle combination on this knife is incredible. In my opinion, the knife felt a bit large in my hand mostly due to the thickness of the blade (from spine to blade edge). As a result, I found I like using my AA Forge Bushcrafter more.


AA Forge Hunter
This is an AA Forge Hunter with walnut handle, 1/8" green micarta liners, and brass pins. The blade is 4 1/4" 52100 steel with an exceptionally share convex grind.


AA Forge Ridgeback
This is the AA Forge Ridgeback. This particular model is made from 52100 1/8" steel with a convex grind. The handle is walnut, with 1/8" green micarta liners, white G-10 sandwich liners, and copper hardware. The blade is 4 1/8" long with a 4 5/8" handle. This is an exceptional handle combination and is exceptional as skinning deer.


Another Ridgeback made of 52100 high carbon steel (1/8”), ivory paper micarta scales, 1/8” brown micarta liners, and burlap
bolster. Shown with a Badger Claw Leatherworks sheath.


This example of the AA Forge Ridgeback with a blade made from 3/16" 52100 steel and a convex grind. The handle is stabilized curly maple with red liners and brass pins. The blade is 4 1/4" with a 4 5/8" handle for an overall length of 8 7/8"


AA Forge Woodsman
This is a Woodsman made from 1/8" 52100 steel in a scandivex grind. The blade an handle on this on are both 4 1/2" The handle material is bone linen with natural micarta liners. The pins are natural micarta with brass lanyard tube.


AA Forge Mini Woodsman

AA Forge Bushcrafter
This was my first AA Forge knife. The knife has green micarta scales over black micarta liners with black G10 pins. The blade is made of 5/32" 01 tool steel in a flat grind. I ultimately sold this one to replace it with a different AA Forge Bushcrafter with a more ornate handle and 1/8" thick blade.


AA Forge Grunt
Blade: 3.5" 01 Tool Steel (1/8" Thick) w/Convex Grind
Handle: Bocote w/ Natural Micarta Liners & Maroon Sandwich Liners (8" Overall Length)
Sheath: Custom Badgerclaw Leatherworks


AA Forge Hiker
Blade: 3.125" 52100 Steel (3/32" Thick) w/Convex Grind
Handle: Walnut w/ Lime Green Pinstripe Liner (7.5" Overall Length)
Sheath: Custom Diomedes Sheath


AA Forge Forager
Blade: 3" 52100 Steel 1/8" Thick) w/Convex Grind
Handle: Dark Curly Maple w/Natural Micarta Liners & Sapphire Burlap Bolster.
Sheath: Custom Red Rhino Kydex


AA Forge/Hidden Woodsman Woodlore (1 of 15)
Released January 25, 2019 – Limited Production
Run of 15 Knives
Blade: 3/32” AEB-L Stainless Steel Blade
Handle: Green Micarta Scales w/Brown Micarta Liners,
White Pinstripes w/ Copper Hardware
Sheath: Badgerclaw Leather Works


Subscribe to:
Comments (Atom)