Wednesday, December 30, 2015

Lykov Family Found Living in Isolation for Over 40 Years!


In the Summer of 1978, a group of geologists scouted the forest of Siberia for potential iron ore deposits.  As they traveled by helicopter across the treetops, they came across what appeared to be a garden roughly 6,000 feet up the side of a mountain.  While there were no records of inhabitants there, this was later found to be the home of a family who lived without interaction with others for over 40 years more than 150 miles from the nearest settlement.  

The group of four geologist were unable to land due to the dense forest.  They instead landed in a clearing 10 miles away and awaited a good day to travel to the newfound area.  The trip to the family's home site was ultimately led by Galina Plisetskaya.

The family of four was found living in a small shack with only one window.  The oldest male (Karp Lykov) came out of the shack as they approached and ultimately invited them in.  The family consisting of the man's two daughters, and son were inside and visibly frightened by their guests.  

The family, with the exception of one daughter who was not yet born, the family left their hometown in 1936 to avoid religious persecution.  They left with a loom, seeds, and a few other items to live in isolation.  The wife lived until 1961 when an especially hard year killed almost all their crops and exhausted their food supply.  She died of starvation to ensure her children lived.

In 1981, three of the four family members all died within days of one another.  The old many, Karp, believe it was due to illness which was brought by their visitors.  Since they lived in isolation, they had no immunity system to fight the illness.  They were offered help but the old man died apparently with the last words, “A man lives for howsoever God grants.”  Karp Lykov died in his sleep on February 16, 1988, 27 years to the day after his wife, Akulina.  The only family member left is a single daughter who continues to live in the same area and refuses to leave.  She still lives there to this day but is now having more difficulty managing.  From another article I found, she has some local people assisting her.  To read more about the family, check out the Smithsonian Article on Lykov Family.  If you can find it, there is also a book about the titled Lost in the Taiga written by Vasily Peskov.

Monday, December 28, 2015

What is a Cruiser Axe?

I've recently become more interested in axes and acquired a new cruiser axe.  This then raised the question of why it is referred to as a cruiser axe?

A cruiser is someone who estimates the potential lumber yield from the trees on a tract of land.  This gives the buyer of the timber an estimate of how much to bid on the standing timber.  Theiser would use a smaller axe which could be carried in the woods for days without difficulty.  The axes were used to mark certain trees or the edge of an area.  

From what I understand, the axes were only used until the 1950's.  At which time, trees were marked with cans of spray paint rather than slash marks from a cruiser axe.  After the switch to spray paint, cruiser axes were still used but not as much in the original manner.

A cruiser axe is generally a double bit axe with a head weight of 2.5 lbs and a handle length of 28".  I'm not aware of a company which currently produces cruiser axes.  However, older versions produced by Sager, Kelly, True Temper, Plumb, and others can be found on online auction sites like eBay.  A few examples can be found in this 1937 Warren Tool Catalog.

While I've not read the book, my understanding is the book titled 'Alaskan Adventure' by Jay Williams covers his experiences as a member of the U.S. Forest Service in Alaska and includes some details on the practices of timber cruisers in years past.

Saturday, December 26, 2015

Grandad's Collins Homestead Axe

This year my grandfather turned 92 years old.  On April 5th, we went through a few tools he had which he felt he no longer needed and wanted me to take.  One of them, was a Collins Homestead axe.

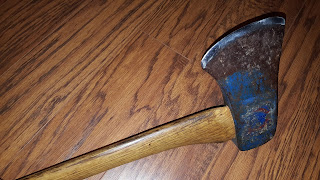
The axe was laying on the dirt floor of a shed in a pile of wooden handled tools.  The axe head was rather rusty but otherwise in good condition.  The handle was very dried out and the portion in the head had started to rot such that the head was barely held on.  I decided to take it home and put a little work into it to see how it would turn out.


I removed the head from the handle and spent some time working to clean up the head with WD40 and some steel wool.  The head cleaned up better than expected.  I certainly could have cleaned it better with other methods but I wanted to keep the appearance and the Collins label.

The Collins Homestead label on the axe is a little difficult to see in the pictures as it is faded and scratched up.  However, the following image shows what the label detail better.


With the head removed, I was able to turn my attention to the handle.  I placed the head on the handle numerous times and slowly removed material from the handle allowing the head to fit lower than before.  This took a considerable amount of time but I was able to drop the head down about an inch which allowed me to cut off the rotten portion of wood while keeping the original handle.


I worked on sharpening the head using a few different items.  The grind was still present to I worked with it so that as little material as needed would have to be taken off.  I started with a file, then used sand paper mounted to a flat piece of wood (220, 400, and 1500 grits).  I was able to get to a polished sharp edge but the metal does not need to get as sharp as other axes I've sharpened.  While I expect it to get the job done, I think the metal quality is not as good as my Kelly Perfect or Kelly Flint Edge.

I put several coats of boiled linseed oil on the handle.  The handle has a very nice aged look to it.  This is accentuated by a dark black mark on one side.  I'm not sure what it is but it does not come off with light sanding.  I suspect it is some type of stain which was slipped on it at one point.


My grandad worked at Payless Cashways for a number of years mostly in the 80's.  He purchased most of his tools there at a discount.  Many items he picked up were returned for one reason or another.  I suspect he purchased this there during that period of time as I believe the Homestead line is one of the more recent lines of axes produced by Collins.

I've several good quality axes.  I feel a little bad as I don't use them as much as you would expect but instead just look at them.  Since my brother does not have an axe and did not get many tools from my grandad, I decided to let him have this one.  While it is not exactly a Christmas present, I decided to give it to him when we get together for Christmas this year.  I decided to take pictures and document the axe so I can look back on it as I wish in the future.

I'll end this with a few more pictures of the axe taken today.


Friday, December 25, 2015

House Orientation and Summer Heat Control

I recently researched the best way to face a house in order to minimize heating and cooling cost.  The topic is of interest as I would ultimately like to have a cabin on the property I purchase.  I expect to start with the property off-grid in order to save costs which makes this topic especially important. 


The best information I found indicated the main axis of the house should run east-west.  This does not need to be exact as being 20% off does not have a significant impact.  This keeps the sun over the ridge line of the house more than pointing at a side which contains windows.

The front of your house, or the side with the majority of the living area, should face south.  The least used rooms (laundry room, closets, etc.) should face the north when possible.  

In the summer months, the sun will be overhead.  The sun then bounces off the living area windows due to the extreme angle of contact.  This keeps as much heat from radiating through the windows. 

In the winter months, the sun drops in the horizon allowing it to contact the windows at a less extreme window.  The windows are not as efficient at insulating light which enters from more of a horizontal direction which allows more heat to enter during the winter months.

Additional research provides the angles at which the sun contacts the Earth in the south.  At the peak of summer (~June 21st), the sun is at an 86 degree angle but in the summer drops to a 38 degree angle.  At March and September, the sun is between these two angles at about 63 degrees.

If you were to plan perfectly, you could include just the perfect amount of roof overhang (porch, shutter, or awning) so that the window is protected as much as possible from summer heat but not so much that it impacts sun entering when lower in the winter.  This is obviously only necessary on the southern side of the house.  The northern side can have a larger window.


I also found some general guidelines which state to keep window surface area to the following:

South Facing
- No more than 10-15% of floor area
- No more than 25% of floor area of each individual room

North, East, & West Facing
- No more than 5% of total floor area
- No more than 15% of individual room's floor area

Thursday, December 24, 2015

Texas Parks and Wildlife - Wildlife Management Coordinator


http://comptroller.texas.gov/taxinfo/proptax/pdf/96-354.pdf

While looking a property the day after Thanksgiving, I noticed this sign on a piece of property.  From what I can tell, this is a program offered by Texas Parks and Wildlife in which you work with TPWD to create a plan to make your property more habitable for wildlife and in turn pay lower property taxes. 

There are two requirements to be part of the program:
  1. Your land must be qualified for agricultural appraisal under Tax Code Chapter 23, Subchapter D the year prior to changing to the wildlife management program.
  2. The land must be used to generate a sustaining breeding, migrating, or wintering population of indigenous wildlife.

The landowner must perform at least three of the following seven activities:
  1. Habitat Control - create or promote a habitat beneficial to wildlife.
  2. Erosion Control - keep soil from eroding for the benefit of wildlife.
  3. Predator Control - Manage predators to the benefit of the target wildlife.  Normally not needed.
  4. Providing Supplemental Water
  5. Providing Supplemental Food
  6. Providing Shelter
  7. Make Census Counts

The program involves making a plan which often consists of each of the seven activities.  The plan must be made in accordance with TPWD regional guidelines which provide generally expected activities for the various regions in Texas.  You can find your region using the following website:
http://tpwd.texas.gov/landwater/land/habitats/post_oak/regulatory/

When I purchase land, I expect it to be in the Post Oak Wildlife District.  Unfortunately, I don't see what is generically prescribed for each region online to determine how extensive the work would be.

Wednesday, December 23, 2015

Using Sodium Bentonite to Seal Ponds

Bentonite is an absorbent form of clay.  There are several types named after their dominant element, such as potassium (K), sodium (Na), calcium (Ca), and aluminum (Al).

Sodium bentonite expands when wet, absorbing as much as several times its dry mass in water. Because of its excellent colloidal properties, it is often used in drilling mud for oil and gas wells and boreholes for geotechnical and environmental investigations. The property of swelling also makes sodium bentonite useful as a sealant, since it provides a self-sealing, low permeability barrier. It is used to line the base of landfills and tanks/ponds.

There are tests to run to see if you need this type sealant when making a pond.  One is to get a five gallon bucket, drill holes in the bottom, put inch or two of dirt from the bottom of your pond and fill the bucket with water.  If the dirt seals the holes and water does not get out then this type of product might not be necessary. 

I've seen individuals suggest putting 2-3 lbs per square foot.  This makes it about one inch thick.  Since the bottom of the tank is not flat, you can't just measure the surface area of the tank when determining your square footage.  Once it is evenly spread on the bottom, you should till it in and then compact the ground.  This makes it essentially part of the floor of the tank/pond rather than just a layer at the bottom.

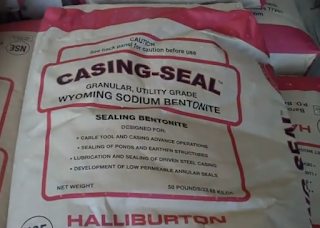
Halliburton makes a product for this purpose which is called Casing Seal. 

Tuesday, December 22, 2015

Inherited Grey Gorge Cruiser Axe

In April of this year, my grandfather turned 92.  Unfortunately, his age has been getting the best of him.  He is no longer able to use the tools he has obtained over the years.  He asked me to go through one of his sheds this weekend to get a few things which I thought I might be able to use.  

On the bottom shelf of a metal rack, behind a lawn mower, I found a cardboard box full of metal brackets and hinges. Buried in the box, I found a double bit cruiser style axe head.  My grandad was not sure of the age but believed it was one which was used in years past by his father.  

The axe has very distinct markings so it is easy to tell the maker. On the side the axe has 'Hartwell Brothers Gray Gorge Memphis Tenn.


From the side view, it is apparent the two sides are not symmetrical.  One side of a cruiser axe is normally not as long as the other side but the difference if fairly minor.  The shorter side of a cruiser axe is normally has a steeper angle to the grind so it can withstand more abuse.  In this instance, this shorter side received a large amount of abuse and was likely ground down over the years to take out chips.

This axe was certainly viewed as only a tool to those who used it in the past.  There are numerous hammer marks along the bottom where it was hammer off and on handles over the years.  


From what I can tell, the axe was produced by Warren Axe and Tool for Grey Gorge which was primarily an handle maker. The axe is referred to as a Cedar pattern axe which I've not heard of before. The source of the information is from 1945 so I suspect it is at least that old but some were made before WW2 (1930's). I've not found much information about the axe beyond this.

I was able to clean up the head using WD-40 and fine steel wool.  I then sharpened up the edges just a bit.  The edges could be done much, much better but my goals was to get them reasonably sharp without removing a great deal of material.  


I installed the axe head on a handle from House Handles.  The head is so worn down, the handle seems very large for it.  The head also seems a little crooked on the handle so I'm not overly happy with it.  I'm not sure if I'll ever try to use it so I'm tempted to take it off the handle and just display it somewhere.  For now, I'll just leave it on the handle and consider it complete.


Monday, December 21, 2015

Welcome to Texas Woodsman!

Over the last five years, I've embraced my interest in the outdoors more through camping, hunting, and just working to be more capable and self sufficient when outdoors.  As time has passed, my desire to have land of my own has continued to grow.  Unfortunately, it has grown much faster than my savings.

While I tackle the large hurdle of saving money to purchase land, I'm going to focus on the secondary hurdle of developing the knowledge to purchase, maintain, and develop land.  I intend to document my efforts in this area here for my reference over time but also for any others who might find it helpful in their search.

While the primary focus will be on purchasing, maintaining, and developing land, I expect my topics to vary greatly.  I fully expect to document equipment which makes being outdoors more enjoyable, homesteading, wilderness survival, off-grid feasibility, and more.