Saturday, December 16, 2017

Hunting Review - 2017

On Labor Day, I setup my feeders and cameras again this year.  

I managed to catch a picture of a 10 point standing a little back from the feeder.  He was only in this single picture.  The camera took pictures from the beginning of September to September 23rd when it ran out of batteries.


I also caught the following 12 point in a few pictures but he was only at the feeder for a single day.  


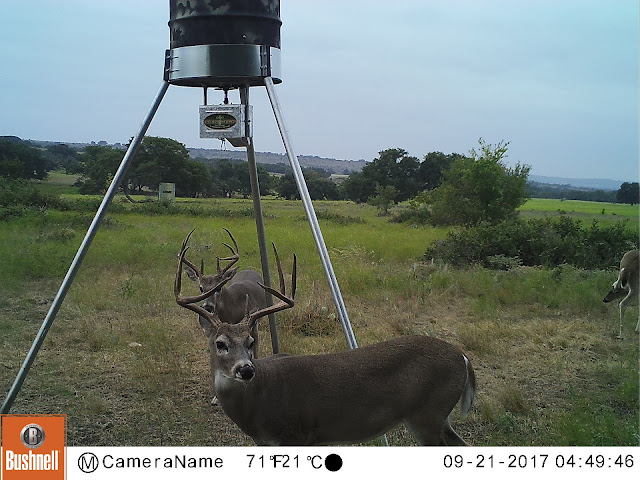
I swapped camera cards and batteries on the weekend of October 14th.  When I retrieved the cards the first weekend of the hunting season, I had no new pictures of either the 10 or 12 point.  I then began to focus on this 8 point which was the largest of those I found regularly visiting the feeder.


I hunted an extended weekend at the lease with plans of shooting the eight point but I never saw him.  I actually did not seem him as much on the game camera after it was swapped out on October 14th.  

I decided to hunt with my son the next weekend (November 11th) to see if we could get his first buck.  I kept my eyes out for the large 8 point but did not see him.  Additionally, we checked the camera and he had not been to the feeder in the last week either.  


Without the option of shooting something I felt would be memorable, I decided to also take my wife and help her to shoot her first deer.  We managed to shoot her first deer the weekend after Thanksgiving.


I let the game camera run the rest of the year and did not see the larger 8, 10, or 12 point.  

Monday, December 11, 2017

DPMS Oracle AR-10 Build (Part 2) - Hand Guard Weigh-In

I've purchased a Diamondhead VRS-T hand guard for the AR10 along with a low profile gas block.  The stock pieces are of such poor quality they made the firearm look and feel cheap.  I selected Diamondhead as I have a similar hand guard on my AR15 and love it.

I removed the front components which are being replaced by the Diamondhead hand guard and slow profile gas block.  These parts weighed exactly 13.3 ounces.  


I weighed the new Diamondhead parts and they collectively weigh 19.3 ounces which is obviously 6 ounces more than the stock hand guard.  I knew it would be close and expected it might weigh more.  My goal was to decrease weight but this was an area in which I was willing to make a consolation.

The new gas block did not come with a roll pin for installation so I will need to pick one up in the next few days.  

Ben Akin Wapiti

This Wapiti design knife was produced by Ben Akin.  It was designed as a hunting knife which was also capable for camping chores.  The blade is 5" in length with a drop point design.  The spine is ground at a 90 degree angle for scraping ferro rods or hides.

The knife is exceptionally well balanced with the balance point being about where you second finger is at on the handle.  This makes the knife feel as if it weighs almost nothing despite being 9 3/4" in length.  This also ensures there is good control of the blade without any fatigue from use.

The blade itself is made from 01 tool steel which has been heat treated and oil quenched.  The blade them received a double temper cycle to improve toughness.  The flat grind makes the edge exceptional at cutting.  

The handle is made from bocote with black g10 liners and pins.  The handle is bonded together with Acraglas.  


I obtained this knife through a trade using an online forum.  When the knife arrived, it did not have the appearance of being maintained very often.  I spent some time cleaning up the flat edges with some 800 grit sand paper and then used a strop to clean it further and then perfect the edge.  A little Obenhauf's on the handle and sheath fixed them up to what is seen above from the starting point below.


Saturday, December 2, 2017

Restoring Grandad's Bucheimer Holster

Before my granddad passed away, I purchased both his shotgun and revolver from him.  The revolver came with a Bucheimer AL-3 holster.  The holster has seen quite a bit of use over the years and is very worn is spots.  The leather is also rather dry and brittle in locations.  I decided I'd clean it up a bit today.


I cleaned up the holster with some water and a towel.  I then coated it with Fiebing's dark brown leather dye and then with some Obenauf's leather preservative.  The sheath has a much more consistent color now.  The Obenauf's helped the leather condition some but it still rather brittle in spots and the stitching has come loose but perhaps the leather will improve if I continue to treat it.


Sunday, November 26, 2017

Adventure Sworn Huntsman #550

For quite a while, I viewed the Adventure Sworn Huntsman as the perfect hunting knife.  Adventure Sworn knives are custom made and I had thoughts of using it for years and it being such a well made knife that I give it to one of my children.  Perhaps it even comes to mind as something they hope to receive from me when I pass due to the frequent use and memories of me using the knife.

In reality, the knife has not been used much as I feel it is a bit too large for my needs.  The knife is just of such high quality, I've not considered selling it.  I take it out occasionally, look it over in admiration, and then place it back on the shelf in the closet.  The time has now come to sell it because there are no memories of using it or reason to keep it if it does not suit your needs.

Each Adventure Sworn is individually numbers and comes with a letter from the maker.  This particular knife is number 550.  The details of the knife are summarized in the letter"

Steel: 01 Tool Steel
Blade Thickness: 5/32"
Grind: Convex
Handle: Desert Ironwood w/Yellow Liners
Handle Thickness: 4/5


Sunday, October 29, 2017

New Entry Gate - Planning

The drive to my property gate is formed from a 50' easement taken equally from my land an my neighbors.  My neighbor states that when no one is around, local high school students park at the end of our drive and drink.  I've never seen any or beer bottles but he states he has pictures of them from game cameras he has setup in the area. 


Two weeks ago while mowing at our land, the neighbor stopped by to say there were some visitors on the drive the week prior.  We discussed adding a gate at the start of the drive and placing a shared combination lock on the gate.  I like the idea as it keeps people off the road but also keeps people from driving down the road and being able to see my cabin.

The following picture is looking from towards where the gate would be added.  I'd like to add on to the post which is closest in the image below.  I'll replicate the existing format with two new vertical posts in the ground with a 16' long top post.  


I measured the existing posts and the vertical posts appear to be 2 7/8" pipe.  


I could not measure the horizontal or top pipe so I measured the circumference.  A little math helped me to find this is 2.5" pipe.  


I need to work on the plan with the neighbor and get more details on his thoughts.  I think it is easiest if I do my side of the easement and the does each.  We can each have a 14' gate which provides a total of 28' opening.  If don'e properly, the center of the two gates is the property line and we each maintain our side.  

Wednesday, October 25, 2017

Fiddleback Forge Monarch


The Monarch "fills the bill" as a multi-purpose outdoor knife. With a 3.625" cutting edge, it is capable of handling most small to medium-sized bushcraft and hunting tasks with ease. The swedge grind allows the knife to excel at tasks that require piercing and gives it the ability to get into smaller areas for finer work. It is a great every-day carry, general purpose knife.


Specifications / Features
Knife Weight - 4.6 oz
Overall Length - 7.75"
Tang - Full Exposed Tapered
Handle Material - Black Canvas Micarta
Grind - Partial Convex
Blade Steel - 01 Tool Steel
Blade Length - 3.625" Cutting Edge
Blade Thickness - .125"
Blade Type - Drop Point
Blade Finish - 3D Spalted and Satin
Other Feature - Black and White Liners
Other Feature - "Bullseye" Lanyard Tube
Other Feature - Swedge Grind

Original Price $365

Sunday, October 22, 2017

Adventure Sworn Wayfarer

The Wayfarer is designed to be a light weight general use bushcraft knife.  It is compact in size, yet the spear-pointed blade has a very substantial 3-3/4" cutting edge, and a comfortable ergonomic handle. The knife has a scandi grind which excels at woodwork.

I picked this particular knife up used and performed a little work to clean it up.  The sheath needed some new edge coat and a good treatment leather protectant.  The spine was damaged from excessive use with a firesteel but I was able to clean it up with careful use of sand paper.  The knife is now back in very good condition.

I've only used the knife a little since I purchased it.  I really like the quality workmanship of both the knife and the sheath.  I'd prefer more of a belly to the blade and less of a pointed tip.  The knife is really designed for wood work which is the reason for these features.  

Overall Length: 8"
Cutting Edge" 3-3/4"
Steel: 01 Tool Steel
Thickness: 3/32"
Handle Material: Brown Canvas Micarta
Handle Liners: OD Green Canvas Micarta
Hardware: brass loveless w/coper tube
Handle Thickness: 3/5


Sunday, September 17, 2017

Steak Lunch on a Split Wood Fire

While at the land today working on the deer stand, I decided to make a split wood fire which would ultimately be used to cook my steak.  I used a Sven saw which I recently acquired by trading a couple of sharpening stones that I don't use.  The split wood fire was the longer way to go about the process but the end result of a nice steak during a hard day sure was nice.


Saturday, August 5, 2017

Sumac Trees


The area I've been clearing for an additional deer stand which is covered with a unique tree/shrub I've not seen before.  I took the picture above and below to research the type of tree it is and found that it is a Sumac.  Strangely, they only grow on the top of this hill area where the soil is sandy and rocky.  

From what I can tell, there is nothing particular special about the tree.  In the past, the tea was made from the berries but there is little other value.  Makes me feel a little better as I've cut down quite a few of them now.  


I found this interesting blog post by an individual who provides good information on how to control and remove sumac.  He suggests the use of Garlon 3A but it seems that also kills oaks and elms so if I were to use it, I would need to be very careful and focused on where it is placed with all the other trees around.

Saturday, July 29, 2017

New Stand Site Planning

I'm working on a new location to place a deer stand on my property.  The existing location requires that you walk into the middle of the property.  With the new location, I can walk along the north edge, cut through some trees, and then be in a clearing which is near the tank.  

The view towards the left of the new location includes the only tank on the property.  It is a little low at the moment as it is the end of July and we have not had much rain lately.

The view straight ahead does not offer much to look at.  There is a small cedar straight ahead about 35 yards.  Just beyond this cedar, the land drops off about 10'.  I won't be clearing any area here as I'd never get high enough to see down that drop off.

The view to the right includes the path that leads to the cabin.  Beyond the path is are some trees.  There is a path in those trees which leads to the current stand and feeder.  I'd like to incorporate a view of that trail as it is frequented by animals due to the years of having the feeder in the same location.

Today, I cleared some of the brush around the edge of the tank so I can see the entire tank from the new stand location.

The next step will be clearing to the right towards where the existing stand and feeder are located.

Here is a video I made mostly for myself before I started work today which shows what you should be able to see from the stand location.  Video


Saturday, March 11, 2017

Building a Barb Wire fence

This week, I spent time helping my dad build a barb wire fence along the back edge of his property.  There are often things you pick up doing such a project but then forget the next time the job is needed.  I'll include some notes on our steps and some ideas to make the process easier in the future.


  • The initial step in this project is building H structures at the end of the areas to be fenced.  If the fence line is longer than 1000' it is best to install another H in the center or every 1000'.
  • Pull string from one H structure to another along ground to get a straight line marking the location of the new fence.  Ensure the string is off the ground and not caught on any twigs which would keep it from running straight.
  • Cut a stick to 10' and use this along string to mark the location of each post.  Use marking spray paint on the ground to mark all post at the same time to speed up the process.
  • When spraying marks, use a T shape mark with the top portion of the T following the string line and the lower portion marking exactly the 10' increment.  You can then remove the string so it is not in the way when digging the post holes.
  • Every 6th post should be wood or metal with T posts used in between.  No T posts are installed until the first run of barbed wire is attached to the wood/metal posts so you can ensure they are straight.
  • Work your way from the bottom to the top with one run of barb wire at a time.  Each run should be similar in how tight the barb wire is stretched.  Fasten each run of barb wire to the T post before starting another row to avoid a tangled mess of barb wire.